如何在CentOS上部署PXE服务器?
- 行业动态
- 2024-12-09
- 3672
在 CentOS 上部署 PXE 服务器,需要安装 DHCP、TFTP 和 DNSMASQ 服务。
在CentOS系统上部署PXE服务器是一项重要的网络管理任务,它允许客户端计算机通过网络启动操作系统,以下是详细的步骤和注意事项:
一、PXE简介
PXE(Pre-boot Execution Environment)是由Intel公司开发的网络启动技术,支持工作站通过网络从远端服务器下载映像,并由此支持通过网络启动操作系统,PXE并不是一种安装方式,而是一种引导方式。
二、PXE工作原理流程
PXE的工作原理流程主要分为以下几个步骤:
1、PXE Client向DHCP发送请求:PXE Client从自己的PXE网卡启动,通过PXE BootROM以UDP协议发送一个广播请求,向本网络中的DHCP服务器索取IP。
2、DHCP服务器提供信息:DHCP服务器收到客户端的请求后,验证是否是合法的PXE Client的请求,验证通过后给客户端提供一个包含分配的IP地址、pxelinux启动程序(TFTP)位置以及配置文件所在位置的响应。
3、PXE客户端请求下载启动文件:客户端收到服务器的回应后,会回应一个帧,以请求传送启动所需文件,如pxelinux.0、pxelinux.cfg/default、initrd.img等文件。
4、BootServer响应客户端请求并传送文件:当服务器收到客户端的请求后,它们之间将有更多的信息在客户端与服务器之间作应答,用以决定启动参数,BootROM由TFTP通讯协议从Boot Server下载启动安装程序所必须的文件。
5、请求下载自动应答文件:客户端通过pxelinux.cfg/default文件成功引导Linux安装内核后,安装程序首先必须确定通过什么介质来安装Linux,如果通过网络安装(NFS、FTP、HTTP),则会在这个时候初始化网络,并定位安装源位置,接着会读取default文件中指定的自动应答文件ks.cfg所在位置,根据该位置请求下载该文件。
6、客户端开始安装操作系统:将ks.cfg文件下载回来后,通过该文件找到OS Server,并安装该文件的配置请求下载安装过程需要的软件包,OSServer和客户端建立连接后,将开始传输软件包,客户端将开始安装操作系统,安装完成后,将提示重新引导计算机。
三、CentOS系统下PXE服务器的搭建与部署
1. 安装DHCP服务
yum install -y dhcp
编辑/etc/dhcp/dhcpd.conf文件,添加以下配置:
next-server 10.112.105.253;
filename "pxelinux.0";
subnet 10.112.105.0 netmask 255.255.255.0 {
    range 10.112.105.2 10.112.105.250;
    option subnet-mask 255.255.255.0;
    option routers 10.112.105.254;
    option domain-name-servers 114.114.114.114;
    default-lease-time 600;
    max-lease-time 7200;
}
启动DHCP服务并设置为开机自启动:
systemctl start dhcpd
chkconfig dhcpd on
2. 安装TFTP服务
yum install tftp-server xinetd -y
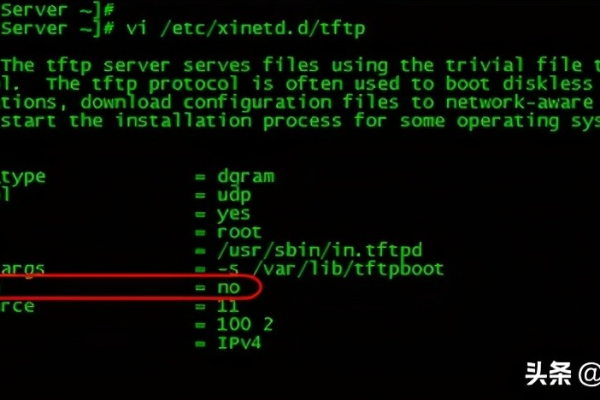
编辑/etc/xinetd.d/tftp文件,将disable参数由yes改为no:
service tftp
{
    socket_type     = stream
    proto            = tcp
    wait            = yes
    user            = root
    server          = /usr/sbin/in.tftpd
    server_args     = -s /var/lib/tftpboot
    disable         = no
    per_source      = 11
    cps             = 100 2
    flags           = IPv4
}
启动TFTP服务并设置为开机自启动:
systemctl start tftp
chkconfig tftp on
3. 配置PXE引导启动程序
PXE启动映像文件由syslinux软件提供,只要安装了syslinux,就会生成一个pxelinux.0文件,将这个文件复制到TFTP默认路径即可,syslinux是一个功能强大的引导加载程序。
yum install syslinux -y
cp /usr/share/syslinux/pxelinux.0 /var/lib/tftpboot/
4. 挂载CentOS镜像并配置HTTP服务
创建目录并挂载CentOS镜像:
mkdir /mnt/cdrom
mount /dev/cdrom /mnt/cdrom
配置HTTP服务以提供安装源:
yum install httpd -y
cp -r /mnt/cdrom/* /var/www/html/centos7/
启动HTTP服务并设置为开机自启动:
systemctl start httpd
chkconfig httpd on
5. 配置自动应答文件ks.cfg
创建自动应答文件ks.cfg,用于自动化安装过程:
vi /var/www/html/centos7/ks.cfg
#platform=x86,64,rootpw --iscrypted $6$randompasswordhash$
autopart
zerombr
clearpart --all --initlabel
inst.projappend=chroot /target isyscpifcfg-other-write=true ip=dhcp kssendmacs=TRUE ks=http://<your_server_ip>/centos7/ks.cfg ksdevice=eth0
%packages --excludedocs
@base @core @minimal-installer text-mode network-scripts openssh-server policycoreutils wget curl tar unzip rsync filesystem-support --level=30 --allowerasing --nobest --noplugins --skipmissing --skipbroken --erroronpkg --holdpkgs --ignoremissing --ignoresize --ignorearch --setopt=tsflags=nodocs --setopt=repos=http://mirror.centos.org/centos/7/os/x86_64/ --setopt=repos=http://mirror.centos.org/centos/7/updates/x86_64/ --setopt=repos=http://mirror.centos.org/centos/7/extras/x86_64/ --setopt=repos=http://mirror.centos.org/centos/7/centosplus/x86_64/ --setopt=repos=http://mirror.centos.org/centos/7/debuginfo/x86_64/ --setopt=repos=http://mirror.centos.org/centos/7/Source/x86_64/ --setopt=repos=http://mirror.centos.org/centos/7/Packages/x86_64/ --setopt=repos=http://mirror.centos.org/centos/7/Everything/x86_64/ --setopt=repos=http://mirror.centos.org/centos/7/fasttrack/x86_64/ --setopt=repos=http://mirror.centos.org/centos/7/testing/x86_64/ --setopt=repos=http://mirror.centos.org/centos/7/testing-source/x86_64/ --setopt=repos=http://mirror.centos.org/centos/7/testing-updates/x86_64/ --setopt=repos=http://mirror.centos.org/centos/7/testing-debuginfo/x86_64/ --setopt=repos=http://mirror.centos.org/centos/7/testing-source-debuginfo/x86_64/ --setopt=repos=http://mirror.centos.org/centos/7/testing-fasttrack/x86_64/ --setopt=repos=http://mirror.centos.org/centos/7/testing-workstation/x86_64/ --setopt=repos=http://mirror.centos.org/centos/7/testing-workstation-source/x86_64/ --setopt=repos=http://mirror.centos.org/centos/7/testing-workstation-debuginfo/x86_64/ --setopt=repos=http://mirror.centos.org/centos/7/testing-workstation-fasttrack/x86_64/ --setopt=repos=http://mirror.centos.org/centos/7/testing-workstation-source-fasttrack/x86_64/ --setopt=repos=http://mirror.centos.org/centos/7/testing-workstation-source-debuginfo/x86_64/ --setopt=repos=http://mirror.centos.org/centos/7/testing-workstation-source-fasttrack-debuginfo/x86_64/ --setopt=repos=http://mirror.centos.org/centos/7/testing-workstation-source-fasttrack-debuginfo-source/x86_64/ --setopt=repos=http://mirror.centos.org/centos/7/testing-workstation-source-fasttrack-debuginfo-source-debuginfo/x86_64/ --setopt=repos=http://mirror.centos.org/centos/7/testing-workstation-source-fasttrack-debuginfo-source-debuginfo-debuginfo/x86_64/ --setopt=repos=http://mirror.centos.org/centos/7/testing-workstation-source-fasttrack-debuginfo-source-debuginfo-debuginfo-debuginfo/x86_64/ --setopt=repos=http://mirror.centos.org/centos/7/testing-workstation-source-fasttrack-debuginfo-source-debuginfo-debuginfo-debuginfo-debuginfo/x86_64/ --setopt=repos=http://mirror.centos.org/centos/7/testing-workstation-source-fasttrack-debuginfo-source-debuginfo-debuginfo-debuginfo-debuginfo-debuginfo/x86_64/ --setopt=repos=http://mirror.centos.org/centos
6. 测试与验证
完成上述步骤后,可以通过网络启动一台支持PXE的客户端计算机,验证PXE服务器是否能够正常工作,确保客户端计算机的网络设置正确,并且BIOS或UEFI中启用了网络启动功能。
四、FAQs
Q1: 如何更改PXE服务器的默认租约时间?
A1: 在dhcpd.conf文件中,可以通过修改default-lease-time和max-lease-time参数来更改默认租约时间和最大租约时间,将默认租约时间设置为600秒(10分钟),最大租约时间设置为7200秒(2小时):
default-lease-time 600;
max-lease-time 7200;
Q2: 如何在PXE服务器上同时支持BIOS和UEFI启动?
A2: 要同时支持BIOS和UEFI启动,需要在PXE服务器上配置相应的启动文件,并在BIOS或UEFI设置中选择正确的启动方式,需要准备适用于UEFI的启动映像文件,并将其放置在TFTP服务器的相应目录下,在pxelinux.cfg目录下创建一个新的配置文件(如uefi.cfg),指定UEFI启动所需的文件和参数,在BIOS或UEFI设置中选择UEFI作为启动方式,并确保PXE服务器已正确配置为UEFI启动提供必要的文件和服务。
本站发布或转载的文章及图片均来自网络,其原创性以及文中表达的观点和判断不代表本站,有问题联系侵删!
本文链接:http://www.xixizhuji.com/fuzhu/365480.html
